How can slime molds compute shortest paths?
(and how to write a simulator from scratch in D3 and Nim)
TLDR
- Slime molds are amazing creatures that can solve complex problems without a central cognitive unit
- I build a simulation from scratch in Nim and visualize it with d3
- The simulation runs and can be controlled directly from the browser
Things to try
- Adjust the FOV slider (blue arc) to see the effects on the emergent structures
- Change the number of agents by changing the number in the orange agent
- Place food sources with the left mouse button to guide agents to other branches of the network.
Introduction
Human are fascinating creatures. We like to think of ourselves as having an identity, a sense of “self” or ego. We like to think of ourselves having a career or skills and hardly express (at least in common speech) about interaction with our environment. But what if you can be both?
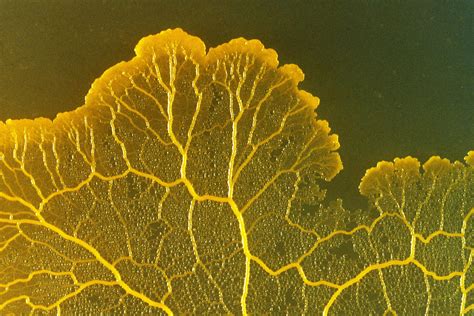
In nature, we often do not consider other forms of live as having an ego. A bird is considered a bird that interact purely with its environment because it cannot control to the same extent as we do. Some organism, however, exhibit a life that could be expressed as living on a spectrum between operating as an individual and as a singular organism. The slime mold is one such creature. The slime mold is a single celled eukaryotic (= having a nucleus) organism that can form spores. These spores are often produces when different slime molds group together to form a multi-cellular organism (1)

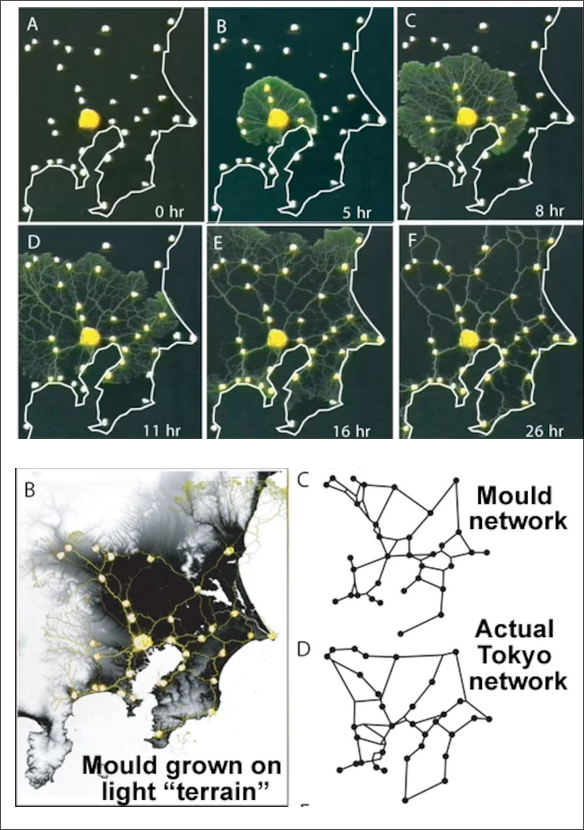
Slime molds are particularly interesting as scientists have studied them extensively for their computational ability. When slime molds search for food, they extend in space by producing spores. Initially, the search is randomly around them, but as soon as these spores find food, the slime mold increases the “traffic” to these spores. Scientists have studied this behavior and found that the slime mold is able to solve mazes (2), reproduce the tokyo metro network
What is amazing about this organism is that it can do all of this without “knowing” the general surrounding. There is no generalized intelligence, or forward planning. Through interactions with its environment the organism can organize and solve complex problems.
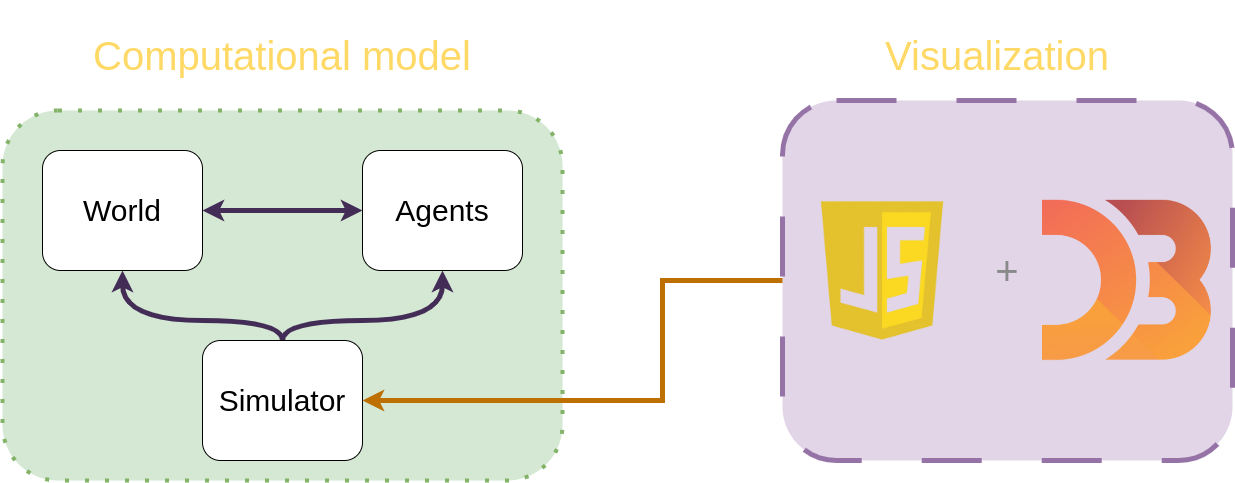
In this post, I want to explore the properties of this organism by building a agent-based simulation from scratch. In addition, I want to explore visualizing the simulation on a web page directly without the use of videos.
The Plan
The goal is to create a simulator that can be run directly from the browser (3). I will use Nim (4 to make the computational model, and create a visual application by using javascript and D3. The visual components will have a control box that can control various aspects of the simulation such as starting and stopping, controlling the number of agents, the decay rate of the resources and so on.
Why Nim?
Nim is a pretty nifty language that writes (and feels) similar to python, except that it is strongly typed. The strength of Nim is that it compiles to javascript, or c/cpp. It was created in 2005 and released to the public in 2008. Compared ot cpp or c it has more features that you would expect from a modern languages. For example, checking that am member is contained with in a list (or sequence in Nim) can be readily done with the `in` command or added with a `contains` function (called `proc`(ess) in Nim). In the past I have written some posts about Nim and its cool features of bridging between different languages http://cvanelteren.github.io/tags/nim), an decided to solve the advent of code challenges in Nim to explore the language and its capabilities.
Modeling a slime mold
- Describe the stages of the slime mold
- Describe the movement vector
The computational properties of the slime mold have been studied extensively both from a biological perspective as well as computationally cite:@Jones2010,@Ito2003,Kessler1993. Arguebly, one of the simplest approach is done by cite:@Jones2010. He applies an agent-based approach to study the pattern formation that emerges through the interaction of slime mold agents.
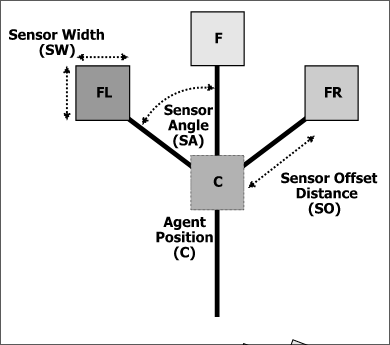
Each slime mold is modeled as an agent in 2D space possessing different sensors (4). Each agent drops food resources in the environment with activity $A_i$ that other agents can sense. The agents have $n$ sensors that can sense location at distance $R_i$ from the agent of width $W_i$. When a food source is sensed by the sensors, the agent orientates and moves towards the sensor with the largest concentration. If the propposed location is occupied by another object, the angle will pick a random angle. When an agent does not move, he does not drop resources in the environment. Over time, the dropped food source will decay from the environment with rate $\delta$.
From these simple dynamics, agents can form chains (5) and with enough agents will form networks (6). The emergence of networks, occurs through the fact that each agent
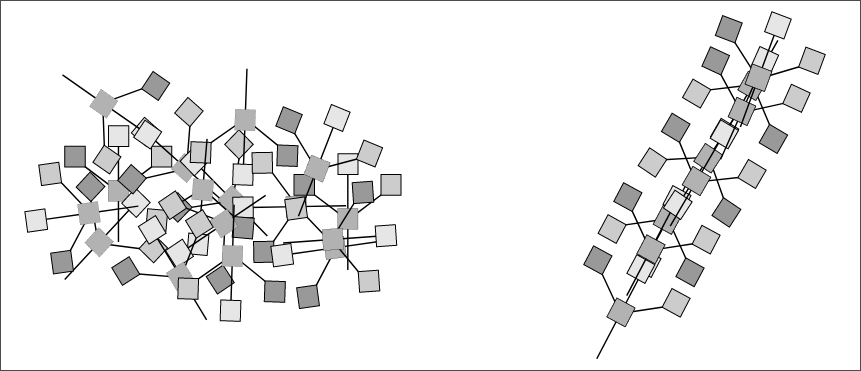
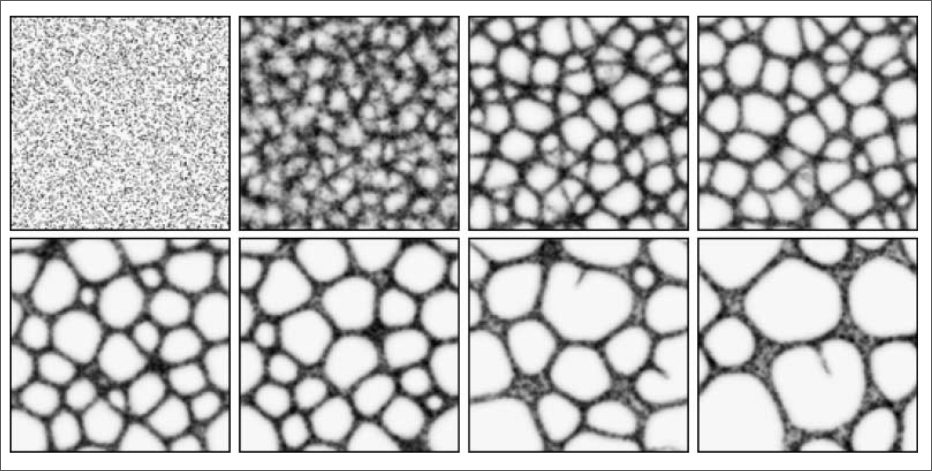
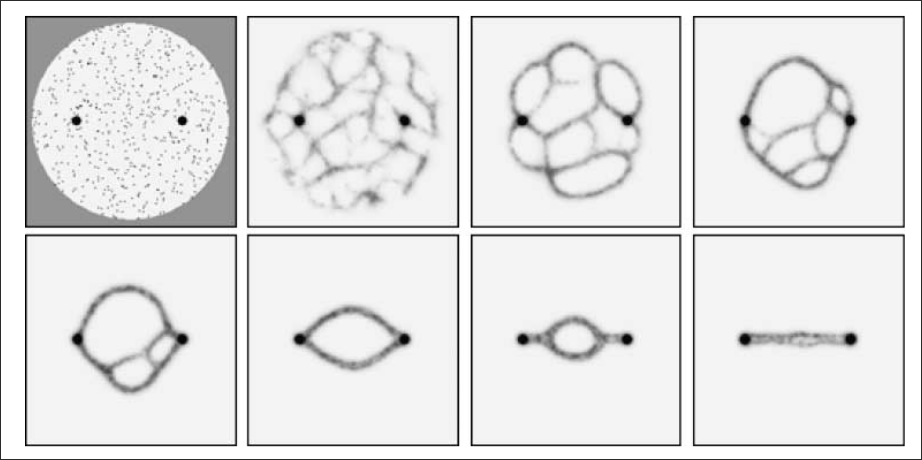
The dropped resources emulate how a slime mold would communicate to other slime molds that there is some food source nearby. Jones ran computational simulations that emulated food sources in the environment. Remarkable, the agents will produce a minimum spanning tree (or network) between the food resources (7).
Code layout
cite:Jones2010 provides an elegant description of a minimal agent-based model for the slime mold. To the best of my knowledge no implementation of this model is available on the internet, so I decided to implement it in Nim. What follows is a bird’s eye description of the relevant methods implemented in Nim. For the source code please see the listed source below.
The simulation would need a way to represent the world the agents can move in, and a description of how the agents can interact with this world. To structure my approach, I propose the following code layout:
Layout of the various components used to generate the simulation
src
├── agents.nim
├── index.js
├── main.nim
├── types.nim
├── utils.nim
└── world.nim
The file names are ordered where the file name reflects what can be found in it. For example, `agents.nim` will contain methods that describe how agents behave. Similarly, `types.nim` will describe the various objects such as the world and the agent and so on. The main endpoint for nim is contained in `main.nim`. Inside this file, the methods are described that are exported to javascript. Lastly, `index.js` will contain the applet with the visualizations of the simulation.
Modeling an agent
Each agent is represented as a struct containing data such as its position, speed, activity and so on.
# file: types.nim
type
  Agent* = ref object
    name*: int
    pos*: Point
    angle*, speed*, sensitivity*, activity*: float
    sensor_reach*, sensor_width*: int
    sensors*: seq[float]
    noise*: float # controls noise added to a movement [ignore for now]
Th e most important factors the snippet above are the sensor related data (sensors, reach and width), the activity (which controls how much resource an agent drops after moving). The noise parameter control how much noise is added to each movement of the agent. For the simulations presented here it can be ignored.
In each simulation step, each agent will
- attempt to move into the direction it is currently facing
- sense nearby resources and orientate itself towards the sensor with the maximum sensed resource
Agent movement
We have to therefore right two functions that represent these abilities. For move we
# file: agent.nim
proc move*(a: var Agent, world: var World) =
  # update agent position
  # move in current direction on grid cell
  var proposal = a.pos + (a.speed * cos(a.angle),  a.speed * sin(a.angle))
  if a.noise > 0:
    if rand(1.0) < a.noise:
      proposal.x += (rand(1.0) * 2 - 1) * a.speed
      proposal.y += (rand(1.0) * 2 - 1) * a.speed
  proposal.check_boundary(world)
  # check if there is another agent at new location
  if not is_occupied(proposal, world):
    a.pos = proposal
    a.deposit(world)
  # assume random directiom
  else:
    # default model behavior
    a.angle = rand_angle()
The agent will attempt to move to the `proposal` location. If the move can be made (no object present at that location), the agent will put resources at the agents location in into the world object (see [6](#Modeling the world)) and move towards the proposal location. When no move can be made, the agent will not perform a deposit action, but merely choose a random new angle.
Agent sensing
Each simulation step, the agent will probe the sensors it has for resources, and orientate themselves towards the sensor that has the most resources. If all sensors have the same concentration of resources, the agent will continue straight.
# file: agent.nim
proc sense*(a: var Agent, world: World): float =
  # get chemical  from sensors
  #
  # The  trail  data  structure  is subjected  to  a  simple
  # diffusion  operator after  every system  step (a  system
  # step is defined as a sensory sampling of the environment
  # and attempted  forward movement for every  member of the
  # population). The diffusion operator  takes the form of a
  # pseudoparallel simple mean filter in a 3 × 3 kernel that
  # is  subject  to  an  adjustable decay  value  to  affect
  # chemoattractant persistence.

  # var concentrations: Table[Point, float]
  var
    concentrations = newSeqWith(a.sensors.len, 0.0)
    prop: Point
    resource: float
    angle: float

  for idx, direction in a.sensors:
    angle = a.angle + direction
    for width in 1..(a.sensor_width):
      let tmp: Point = (x: a.sensor_reach.float * cos(angle),
                y: a.sensor_reach.float * sin(angle))
      prop.x = tmp.x + a.pos.x
      prop.y = tmp.y + a.pos.y

      prop.check_boundary(world)
      resource = world.data[prop.x.floor.int][prop.y.floor.int]
      # threshold activity
      if resource >= a.sensitivity:
        concentrations[idx] += resource
  result = a.follow_gradient(concentrations)
Modeling the world
The agents are not interacting in a vacuum, there is world to be created! The world object will hold the agents, and a 2D plane on which the agents can deposit resources. The resources over time will decay to produce a trail map. The update will occur synchronously for all agents. That is, each agent is updated in random order with a current (frozen) state of the world. The new data will form the next step in the simulation.
proc difuse*(world: var World)  =
  # update synchronously the world trail
  var
    new_data = newSeqWith(world.data.len,
                            newSeqWith(world.data.len, 0.0))
    n = world.xmax * world.ymax
    z = 1/(float moore.len)
    pos: Point
    val, y: float

  for idx in 0..<n:
    pos = un(idx, world.xmax, world.ymax)
    val = difuse_on_point(pos.x.int, pos.y.int, world)
    y = world.data[pos.x.int][pos.y.int]
    new_data[pos.x.int][pos.y.int] =  y + world.decay * (val * z - 2 * y)
  world.data = new_data
Connecting Nim to Javascript
In the end, we want to view the output of our hard labor. Although Nim is a nice language to write in, it lacks the eco system that other languages such as python has. For plotting, great toolboxes already exists, e.g. plotly, matplotlib, vispy, ggplot, and so on. D3 is one such great projects which particularly excels at sharing (interactive) graphs on the web. Luckily, Nim can interface readily with other languages, and in particular has a close connection to javascript.
What is webpack?
Webpack bundles javascript modules (both installed and written by you, see here) into a singular target that is compact and fast to use. Edits in your files are updated as you write code. It exists as a sort of bridge between the old way of writing javascript modules (with CommonJS), and the modern way of writing modules modules (using the ES format).
To interface with javascript, I will use a package called nim loader which can be used by webpack to allow the written nim module to behave like a javacript module.
To use nim as as a javascript module, we first install nim loader using nimble (nim’s package manager)
nimble install nim_loader
Then, we start defining our webpack config. The end point for our webpack will be a bundled file that contains our nim module. Per tradition we call this endpoint `bundle.js`. Then we add a rule to the webpack config to include our nim loader package that will take care of our nim files. The config in webpack looks something like
const config = {
  entry: "./src/index.js",
  output: {
    path: path.resolve("../../content/scripts/nim_loader"),
    filename: "bundle.js"
  },

  module: {
    rules: [
      {
        test: /\.(js|jsx)$/i,
        loader: "babel-loader",
      },
      {
        test: /\.(eot|svg|ttf|woff|woff2|png|jpg|gif)$/i,
        type: "asset",
      },
      { test: /\.nim$/,
        use:
        [{
                loader: "nim-loader",
                options: {
                  flags: ["--threads:on"] // does not work in javascript :(
          }
        }
              ]
      },
      // Add your rules for custom modules here
      // Learn more about loaders from https://webpack.js.org/loaders/
    ],
  },
};
Now that we have our webpack setup, we need to define our export function that will be accessible from javascript. I will write our export inside `main.nim` as such
import jsffi # javascript foreign function interface
from types import World, Agent, rand_pos
from agents import move, sense, move, consume
from world as worlds import difuse
import std/[random, sequtils]
random.randomize() # setup rng
proc newWorld*(n, xmax, ymax: int,
               decay: float = 0.2,
               agent_config: JsonNode,
              ): World  =
  echo "Creating world"
  world = World(xmax: xmax,
                 ymax: ymax,
                 data: newSeqWith(xmax, newSeqWith(ymax, 0.0)),
                 decay: decay,
                 agents: @[])
  # var agent: Agent
  echo "Creating agents"
  for id in 0..<n:
    var agent = newAgent(id, world, agent_config)
    world.agents.add(agent)
  return world

proc step*() {.exportc.}=
  world.move_agents()
  world.sense_agents()
  world.difuse()

# define our export for the nim module
var module {.importc.}: JsObject
module.exports.newWorld = newWorld
module.exports.step = step
Now we can import the `newWorld` and `step` function directly from javascript:
//file: index.js
import module from "main.nim" //importing a nim module!!
The module object will expose the `newWorld` and `step` function. Since `newWorld` returns a `World` object you may wonder what happens when you call this function. Interestingly, the `World~ object is directly accessible in javascript (given that the properties are exposed in Nim).
We have now reached a point where we could start writing modules in Nim and then exposing them through javascript. Nim can also be used to directly interact with the dom. Some modules (such as D3) have (incomplete) bindings such that nim can even be used to ditch javascript all together if needed. This is a nifty tool in your toolbelt if you want to harness the power of nim on the web. It makes your nim code more portable if you want to write applications or simulations and share them on a shiny dashboard.
Building the applet
Initially, I wanted to build a simple control panels with toggles that could be used to change control parameters to the model. There are lots of control parameters that can be changed. In the end I opted to implement a more elaborate control box that emulates the view of 4. This idea proved to be more problematic than I initially thought.
Providing lots of toggles will be overwhelming, and I tend to prefer a more visual approach to complex information; using colors and graphics often eases understanding of a complex situation more readily than lots of text or other forms of media.
In the end, the applet was a combination of some uggly programming in
d3, future me will clean this up. The part that took lots of efford was
figuring out why a nested svg does not visualize a foreignObject. I
am not sure why it does not allow for this but I expect it has something
to do with the name space that is loaded.
For the interested individual I have included the code below, but be warned traveler, the journey was rough!
D3 code
import module from "./main.nim";
import config from "./config.json";

var minView = 4;
var maxView = 12;
var minR = 0.5;
var maxR = 1.5;

var [world, data] = newWorld(config);

var showAgents = false;
var startSimulation = false;
var timer;

function newWorld(config){
    // wrap nim function as passing objects between javascript and
    // nim produces memory errors

    world = module.newWorld(config);

    var data = []
    for (var x = 0; x < world.data.length; x++){
        for (var y = 0; y < world.data[0].length; y++){
            data.push({x: x, y: y, z: world.data[x][y]});
        }
    }
    return [ world, data ];
}

// setup app
let row = d3.select("#slimeMold")
    .append("div")
    .attr("class", "row")
    .style("display", "flex")
    .style("justify-content", "center")
    .style("width", "500")
    .style("height", "500")

// init control variables
let agent = row
    .append("div")
    .style("margin-left", "50px")
    .style("margin-right", "10px")
    .style("display", "flex")
    .style("flex-direction", "column")
    .style("width", "55px")


let canvas = row.append("div")
        .append("canvas")
        .attr("width", "300")
        .attr("height", "300")
    .attr("margin-right", "0px")
    // .attr("display", "flex")

// plotting utils
let context = canvas.node().getContext("2d");
let width = canvas.node().clientWidth;
let height = canvas.node().clientHeight;
let factor = 0.0;
var square_width = (width / world.xmax) ;
var square_height = (height / world.ymax);

let xScale = d3.scaleLinear()
    .domain([0, world.xmax])
    .range([factor * width, (1 - factor) * width]);

let yScale = d3.scaleLinear()
    .domain([0, world.ymax])
    .range([factor * height, (1 - factor) * height]);

let oScale = d3.scaleLinear()
    .domain([0, 10])
    .range([0, 1]);

let viewScale = d3.scaleLinear()
    .domain([minR, maxR])
    .range([minView, maxView]);

let cmap = d3.interpolateViridis;


function bind(data){
    // this lives in memory
    d3.selectAll("data").enter().remove();
    var squares = d3.selectAll("data")
        .data(data);

    var enter = squares.enter()
            .append("custom")
            .attr("class", "rect")
            .attr("x", e => {return xScale(e.x);})
            .attr("y", e => {return yScale(e.y); })
            .attr("width", square_width)
            .attr("height", 0)
            .attr("fillStyle", e => {return cmap(oScale(world.data[e.x][e.y]))});

    squares.merge(enter)
        .transition()
        .attr("width", square_width)
        .attr("height", square_height)
        .attr("fillStyle", e => {return cmap(oScale(world.data[e.x][e.y]))});
}

function drawAgents(){
    if (showAgents){
        for (var agent in world.agents){
            let x = xScale(world.agents[agent].pos.Field0);
            let y = yScale(world.agents[agent].pos.Field1);
            context.beginPath();
            context.moveTo(x, y);
            context.fillStyle = "gray";
            context.arc(x, y, 3, 0, 2 * Math.PI);
            context.fill();
            context.closePath();
        }
    }
};

function draw(){
    context.clearRect(0, 0, context.clientWidth, context.clientHeight);
    d3.selectAll("custom.rect").each( (node, idx) => {
        let x = xScale(node.x);
        let y = yScale(node.y);
        let color = cmap(oScale(world.data[node.x][node.y]));
        context.fillRect(x, y, square_width, square_height);
        context.fillStyle = color;
    });
    drawAgents();
    }

function simulate(){
    function step(t){
        module.step(world);
        draw();
    }

    if (timer == null){
        timer = d3.timer((t) => {
            step(t);
        });
    }
    else{
        timer.restart((t) => {
            step(t);
        });
    }
};


let controlGroup = row.append("div").style("margin-left", "0px");

let point = {x: 100, y: 100};
var radius = 40;
var scale = 0.1

var r = 1;
function controlVisual(event){
    if (event.dy <= 0){
        r += scale
        r = Math.min(r, maxR);
    }
    else {
        r -= scale;
        r = Math.max(r, minR);
    }
    // bug.attr("transform", `scale(${r})`);
    let transform = `translate(${point.x}, ${point.y}) scale(${r})`;
    d3.select(this).attr("transform", transform)

    config.agent.sensor_reach = viewScale(r)
    for (var idx = 0; idx < world.agents.length; idx++){
        world.agents[idx].sensor_reach = config.agent.sensor_reach
    }
};


let bugCanvas = controlGroup.append("svg")
    .style("width", "150px")
    .style("left-margin", "0px")

let tlt = controlGroup.append("xhtml:div")
    .attr("class", "xhtml:tooltip")
    .style("opacity", "0")
    .style("background-color", "#FBFAF5")
    .style("color", "transparent")
    .style("border", "solid")
    .style("padding", "10px")
    .style("width", "300px")
    .style("height", "70px")
    .style("border-radius", "20px")
    .style("padding", "5px")


let bug = bugCanvas.append("g")
    .append("path")
    .attr("id", "bug_field")
    .attr("transform", `translate(${point.x}, ${point.y})`)
    .style("color", "steelblue")
    .attr("d", d => {
        var innerRadius = 0;
        var outerRadius = radius;
        return d3.arc()({innerRadius: 0,
                         outerRadius: outerRadius,
                    startAngle: -1/4 * Math.PI,
                    endAngle: 1/4 * Math.PI}
                             )
        }
    )

bug.call(d3.drag()
          .on("drag", controlVisual)
         );

let fo = bugCanvas.append("foreignObject")
    .attr("width", "50px")
    .attr("height", "50px")
    .attr("x", 80)
    .attr("y", 90)

let agentInput = fo.append("xhtml:input")
    .attr("xhtml:type", "number")
    .style("width", "2.5rem")
    .style("border-radius", "50%")
    .style("aspect-ratio", "1/1")
    .style("text-align", "center")
    .style("background-color", "#cc5500")
    .style("border", "0")
    .style("outline", "none")
    .attr("value", config.agent.nAgents);


bugCanvas.on("mouseover", (event) => {
    // tlt.attr("x", event.x)
    // tlt.attr("y", event.y)
    // tlt.style("visibility", "visible")
    tlt.style("opacity", 1)
        .html(`
        <p style='font-size: 10px; color: black'>
        <b>Drag </b> the cone to change the agent's field of view.
        <br> <b>Change</b> the number to increase or decrease the number of agents.
        </p>`)
        .style("left", `${event.x + 70}px`)
        .style("top", `${event.y}px`)
})

bugCanvas.on("mouseout", (event) => {
    // tlt.style("visibility", "hidden");
    tlt.style("opacity",0)
})


let resetButton = agent
    .append("input")
    .attr("type", "button")
    .attr("value", "Reset")
    .attr("width", "100px")
    .attr("height", "100px")
    .style("name", "test");
    // .style("width, 100px")
    // .style("height", "100px");

let startButton = agent
    .append("input")
    .attr("type", "button")
    .attr("value", "Start")
    ;

    // .style("width, 100px")
let decayRate = agent
    .append("label")
    .attr("display", "flex")
    .attr("flex-direction", "row")
    .attr("for", "#decayRate")
    .style("width", "auto")
    .style("height", "1px")
    .html("<p style='font-size: 9px; margin-bottom:0px; margin-top: 10px'> Decay rate </p>")
    .style("margin-bottom", "0px")
    .append("input")
    .attr("type", "text")
    .attr("id", "decayRate")
    .style("width", "50px")
    .style("margin-top", "0px")
    .attr("value", config.world.decay);

decayRate.on("change", () => {
    config.world.decay = decayRate.node().value;
    world.decay = config.world.decay;
})

startButton.on("click", () => {
    startSimulation = startSimulation ? false : true;
    startButton.node().value = startSimulation ? "Stop" : "Start";

    if (startSimulation){
        simulate();
    }
    else{
        console.log("timer stopping")
        timer.stop();
    }


})

agentInput.on("change", () => {
    config.agent.nAgents = agentInput.node().value;
    [world, data] = newWorld(config);
    bind(data);
    });

agentInput.on("dblclick", () => {
    showAgents = showAgents ? false : true;
    // showAgentsInput.node().value = showAgents;
})

resetButton.on("click", () => {
    [world, data] = newWorld(config);
        bind(data);
        draw();
    })
// when loading the page, we show the data and draw
bind(data);
draw();
Discussion
This project was fun to put together and as always took way longer than I wanted to. I am interested to explore further the interaction of web visualization and programming languages. I really enjoy seeing my simulations come to live and being able to quickly share a link with a fellow friend, or show the efforts of my labor off to a co-worker. Nim is a joy to write in, and I wish the eco system was bigger for computational goals. Perhaps in the future I will write some network analysis toolbox for it.
Conclusions
- I love writing in Nim, it writes like python but with highly performant code in the native language.
- Binding Nim to javascript is easily achieved which opens up lots of opportunity to combine it with interactive libraries such as D3.
Casper van Elteren
Computational scientist | Data scientist | Tinkerer
I am a computational scientist interested in data analysis, visualization and software engineering.